...a little or a lot!
You said to tell you what I want to learn to prune. A
mugo pine. You showed one that was pruned but now HOW. Do mugo pine
again, with feeling, okay? Thanks! - M.C. -
Here you go! Lots of photos to tell the tale. First, the story
of an overgrown mugo cut back. Second, details
of the tip cuts applicable to any shrub being shaped and/or
"stopped" -- kept smaller than its potential. Third, notes for routine pruning of not-too-big
mugos.
In cutting back or even simply shaping a mugo pine you must know
how much you can cut. To learn that, look inside.
Below: We want to cut this shrub back to fit in its bed.
Every branch that has needles within the bed is a potential keeper,
needing only to be shortened. Those that have only wood -- no
needles -- within the desired new outline are history.
Look inside the shrub. See all the bare branches crossing
above the line of black edging? Each must be cut back to a crotch
to leave a side branch that has some greenery within the
bed.
Some of these branches have no such crotch, so we'll cut
them to the ground.
.

We can cut a pine back to any side shoot that ends in needles
and a bud. However, the smaller that twig, the longer it will take
to beef up and resume branching with gusto like the chubby mugos
people love.
Above: There are needled branches deep inside this mugo, so
it can be cut back to that point.


Above, left: Here is a mugo with some branches removed so
you can see the pruning process in cutaway view. notice there is
greenery in the depths, so it can be cut back that far.
Right: There are some options short of that deep cut.
Ultimately we'll go deep, taking out all that bare-branch expanse
with big lops. (That's what we did to that other mugo we reduced to "start over"
size. ) For you, we'll cut
back in stages so you can see the other options.
) For you, we'll cut
back in stages so you can see the other options.
Follow the pointing finger -- that's a place where branches
branch. If we cut to that depth we can reduce height and width by
about 6 inches all around.


Above, left: Making those cuts. (More detailed look at individual cuts below.)
Above, right: So now Janet has cut it shorter in the middle.
So far, she's left branches untouched at the left side of the
photo, to show you how much lower the middle has become.
Inside, there are more, lower side branches with needles. So we
know we can cut harder.


Above, left: Finishing the first-stage reduction.
Above, right: We could leave the shrub like this. However,
its outer edge comes right to the black line that is the bed edge
whereas we want it to be SMALL and round well within the
bed.

Above: So it's lopper time, because there is green at the
ends of those branches, then nothing but bare wood until we reach
the base. Those way-down-low needled branches are where we're
heading.

Above: There you have it. Starting from here we can have a
chubbie, small pine in about 18 months.
Is 18 months too long to wait for beauty at your front door?
Then start with a new dwarf mugo and two aims:
- One, make sure that what you buy is truly a dwarf. Pinus
mugo is Swiss stone pine, with the potential for about 15' in
height. The standard "dwarf" mugo is Pinus mugo mugo which
can hit 8 or 9 feet. The variety P. mugo 'Pumilio', and
others are shorter, usually under 3 feet (Although with potential
for incredible width.).
- Two, cut it regularly as in the next three photos, beginning
from the time it first brushes the line that is your outer
limit.
A closer look at individual
cuts


Here are less radical cuts made to another overgrown dwarf
mugo.
("And what about a
not-overgrown mugo?" you may ask. Clip as in photos 1 and
5 below, to remove every bit that crosses the lines you set for
height and width, and thin the most congested areas so its interior
receives enough light to maintain deep foliage. Hard to "show you"
that since if you do it well the shrub looks the same after pruning
as before. The shrub in photo 6 has been pruned that way.)
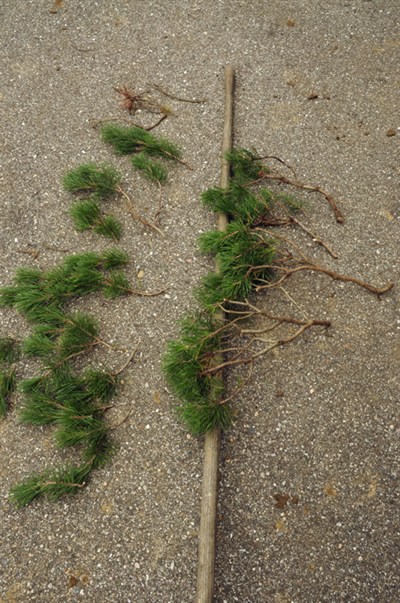
1. Pretend the rake handle marks the outer edge of the
biggest mugo we want. So we'll cut all these branches so that they
end at or behind the line, far enough back that they can grow for a
year or two.
2. Notice the much-branched, leafless interior twigs. Each
"Y" or "W" juncture marks a place that was shorn while the growth
was all soft candles in spring. At each cut multiple tips developed
as the whole layer advanced by the length of the "Y" or "W."
Moral of the story: Shearing makes a plant dense but unless
it's accompanied by cuts that go deeper, the plant keeps increasing
in size.
3. This pine never had that thinning. It has all its foliage
so close to the line that it now must be cut with great
care...
4. ...back to the little bitty needled side shoots.
5. Okay, we've cut what crossed the line. More importantly,
we cut some branches further so
light can penetrate to the depths.
6. Here is the shrub these branches came from. They are
branches Janet took out to let light in.
She first cut all the way around the plant as in photo #5 . That
left the plant smaller but looking almost the same as when she
started.
Then she did what hadn't been done before -- cut out some branches
'way back to interior, needled side branches. Can you see the dark
gaps? They are not very noticeable except where you are standing
straight across from one of them, but are vital to keep the shrub
healthy and prevent it from creeping larger each year.
7. The light will reach those tiny, weak bits of green in
the center. They really need to build some bulk for a year or so
before we cut this shrub as far back as the first example.
So that's that. Hope it helps you go cut your mugo, or make the
determination to start over.