...now we know to stay on top of conifers!
It's a mistake to let an arb get away from you, but reducing it
sure can teach a thing or two about how much little bits of green
can grow.
We have arborvitaes that we've loved but now they're
getting to big and we think we made a mistake in not clipping them
at all, earlier. Can we cut them back to make them smaller? - S.S.
-
You can cut them back. After having been let go they may be
somewhat unattractive for a year or so after the cut. Below, the overall process and then two real-life examples.
Note: Junipers, pines, spruces and
firs...
...follow these same patterns in growth and recovery after a
cut. They do not sprout from bare wood but grow only from shoots
that still have foliage.
Lesson from our
class
Here is how we explain this cut-back in our class, Fine
pruning the landscape. (You can invite us to come speak or teach a
class in your community.)
Below: This an upright arborvitae (Thuja
occidentalis; also known as eastern cedar or American
arborvitae). We'll show it to you in cross section so you can "see"
the interior branches.


In terms of height: However far back you want to cut it, just
cut it there. As long as it has foliage below that point you can
work with it.
Cut back or remove all bare wood. Lop or saw branches to end
just above strong greenery (green bars in the drawing at
right), or just above the branch that bears good foliage.
Wait now while the light reaches in to the interior foliage
(arrows "a" in the draing at right) and it beefs up. This
may take six months or a few years depending on how healthy the
arbs were to begin with and what the growing conditions are.
Eventually, you will cut off the over-wide side branches, too.
Cut them at a low point above greenery (such as at b, at
right). Since they have the lion's share of the foliage at the
beginning of the cut-back, it's a good idea to leave them to
provide the plant with energy while the interior builds
strength.
Lessons from
life
Here's that process happening on two healthy arbs in good
growing conditions. Both shrubs had become too large despite some
pruning. They were too tall and also too wide.
(If your arbs are bigger than those shown below,
the process is the same, although you will need
a bigger saw! If you would Sponsor this page
we can spend the additional time to add photos
from this process as it occurred in cutting
back a 30 year old, 20' arborvitae hedge.)
This one wasn't too far gone. In ten minutes we made it shorter
by four strips of house siding, and took away half its girth.


We see that next time we prune it we can remove one whole trunk
to make the plant thinner and more gracefully pyramidal. 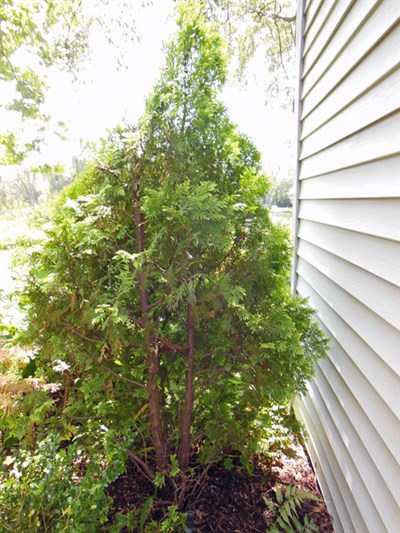
Right: See that there are two main trunks. The expendable
one is the trunk furthest from the house wall.
For now, we left that extra trunk in place for the sake of its
lush foliage, even though it makes the plant ungainly and too wide.
For about a year we'll let small, interior shoots make more of
themselves in the increased light on the better placed trunk fill
in.

Here's an arb that took two years to cut back in three
stages.
The story startsafter the plant's already been cut once to make
it shorter and somewhat more narrow.
Right: We begin with this photo taken four months later when
a summer's worth of light had stimulated growth in the
interior.
Probably you notice the gap top center, where we cut the main
trunk down by a bit over three feet in that stage one pruning.
Below: We cut that trunk down to the lowest strong green
buds we saw. See them now, on the stubs in the plant's
center?


Right: They've grown out considerably. We're
encouraged.
Below: We reduced the sides, too -- sheared them back and
then cut each woody stub to where there was green foliage or a
green bud.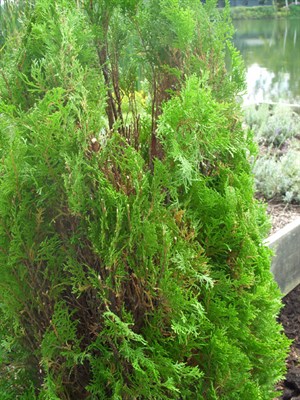


Below: Since it's growing so well we cut it back harder. We
cut the sides short, left that tip full of new leaf as the high
point to start establishing the new shape. We did this in early
April to take advantage of the plant's natural tendency to produce
new shoots in spring.
It may look like nothing more than a bunch of wood -- and you
might think it's dead wood, since an arb doesn't sprout from any
woody part that's stopped producing leaves.


Right: However, just look at all the green buds that
were showing themselves in early spring, because our cutback the
previous year let sun in to those branches just in time to keep
them in production.
Below: Here's the plant three months later. Truth. No tricks
involved.

Below, left: And here it is ten minutes after that, once
we've trimmed it for shape. The most significant cut in
establishing that new narrower shape was to cut out the too-wide
branches we'd left in place as energy sources. As we showed in the
drawings of this overall process.
Below, right: Finally, compare what we have now to where we
started at the top of this page. Overall, we reduced this arb to a
bit more than half its former self. We won't let it get away
from us again.


Please put a Sponsor message here.
We need your help to keep writing!