You thought they are little? Better learn to prune 'em!
Three factors add up to the conclusion that all Japanese maple
owners should learn to prune these beautiful trees.
1) Japanese maples are small trees but bigger than most people
expect. So an upright tree that can be 20' tall is placed in a 12'
and a "cute little weeper" is planted in a 3'x 3' patio bed
although it has the potential to spread 10' or more.
2) Many of these trees also grow 8 to 18" per year, faster than
most people expect -- people assume that something expensive is
slow growing.
3) Japanese maples are often planted
in exposed situations which cause branch dieback. There is almost
always dead wood to be removed, and the need to recognize weak
wood, then elect and encourage suitable replacement branches.
*Notice the dead stub left
remaining from
some past, ill-advised cut? Here are
good
reasons to avoid leaving stubs
as you prune!
**For details about protecting an
exposed
Japanese maple see What's
Coming Up #68,
Pretty protected maple
trunk, or Upfront maple.
Looking for this tree? 
The photos and notes here came from pruning the Japanese maple
in Dwarfs cut to size plus two others on that property.
All were treated similarly since all three are dwarf weeping forms
which had accumulated deadwood, need to be restricted to smaller
spaces than they could fill, and are fast growing. Since the light
was poor for photos around the lakeside tree from Dwarfs cut to
size we're showing you its similar neighbors, instead. (Sorry,
troopers! You know we garden for a living and do this writing as a
side. Can't forgo garden work to wait for light!)
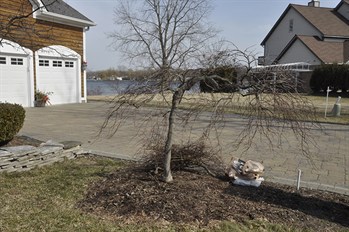
Before, after:
Here's a tree before (left) and after pruning. Our goals were:
To keep the tree within a 5' x 5' space so it will not block the
walkway. To create a more graceful form since its bare limbs are on
stage right outside the front door for four months each year.


This is the tree whose damaged limb is shown close up at the
top of this page. Some people are surprised that a tree close to a
building has more exposure damage than one out by the road. That's
the case here, where two of four Japanese maples on the property
are within a few feet of the building, two are more out in the
open. Those near the building had the worst damage, probably
because those spaces near the building warm up more on a winter day
so the harmful drop in temperature at sunset is even more
precipitous.
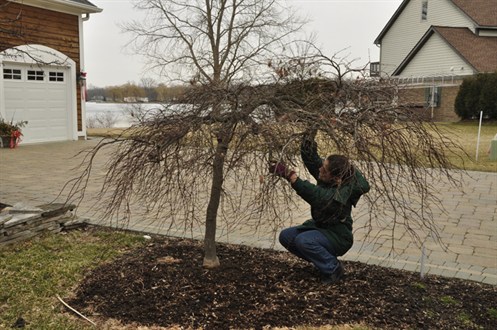
And now, the "during"
We start out under a weeping tree because we can usually see the
branching pattern better, there.
For instance, we had this exchange at this point:
Janet, under the tree, "And we'll have to take this one out, right
here."
Steven, a few feet away, "Whatever you say, I can't see it or show
it from here!"
What Steven could see (below, left) and what Janet saw
(deadwood; arrow, below, right).


Below, left: From outside the tree's canopy Steven could see
the awkward, spider-like cluster of branches that had developed
over years at the end of a branch repeatedly lopped off at the same
point -- its punishment for straying over the driveway.
Below, right: From below, Janet could see that the whole
limb (right arrow in this composite image) could be removed without
creating a gap, as a replacement limb (left arrow) is already in
position.


Assessment done, the cutting goes quickly
We removed the deadwood, sawing to leave only the collar. No
stubs!
Below: We took out the branch that had been deformed by
uninformed lopping.


Below: There it goes, out and not missed.

Then we addressed each branch we'd elected as primary -- 4
spokes from the trunk that will be "keepers" because they're
graceful, healthy and each one fills a distinct portion of the
canopy. We went to the end of each of those limbs and shortened it
by two years' growth. Then we worked back toward the trunk,
shortening each main limbs' side branches by two years, also.
Below, left: Janet's holding the branch she's shortening.
(Detail.) She'll clip to just below
a side branch above her hand. Overall, the main branch ends about
15" short of where it was. The tree's exhibited an 8-10" growth
rate.
Below, right: That's Barb Sturtz with Janet, who called us
in to sort out these trees. She is fun to work with -- learns
quickly and has no fear! Between the two of them the pruning went
quickly and generated a lot of clippings.


So here's the before and after.
Compare them to see that we shortened and thinned the drapery.
Something we can't show, given the available lighting and
background: We changed the canopy as seen from a bird's eye view.
What was a rough circle is now an oval that's longest along the
axis parallel to the pavement.
By the way: If you dislike the shape, that's fine. There is no
one right way to prune for aesthetics!