60 minutes every two years to keep a
big evergreen small
This spruce was in place when the current owners moved in one
year ago. After one holiday lighting season they have determined
that 1) they like the tree with lights and 2) it can't get any
bigger or they won't be able to light it. A distant third
consideration is the fact that if allowed to grow it will be too
large for the yard and may be interfering with overhead utility
lines in about 10 years.
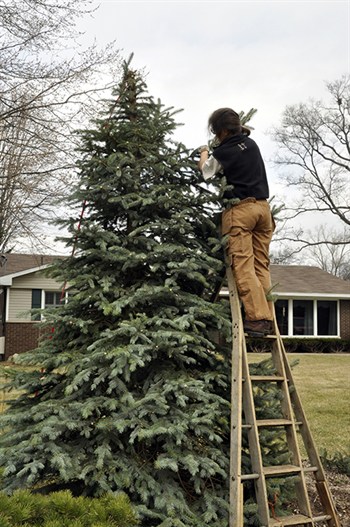
We told the owners, "If we could have started pruning it last
year it would have fit our criteria perfectly -- we would have
started cutting as it reached the height of 'Janet plus a ladder,'
then we would prune every two years. However, it's still do-able
because the tree's in good shape, healthy and with plenty of
densely needled branches deep into the plant. So we can cut it back
by THREE years' growth now and put you on schedule to re-do this
cut every two years in August or late winter."
The owners said "Go for it." So we did. And here's what we
did.
Note: What you see here applies to any spruce, fir, false cypress,
juniper or arborvitae, including dwarf varieties.)
Above: A spruce breaks bud
(arrow).
We like to finish all reduction pruning
before the plants break bud in spring.
More about why this
is.


Above: Before (left) and after we cut.

Right: First we checked to be sure the tree has foliage deep
enough into its interior to remain healthy and full after the cut.
To help you see how we did that and what we will do, we've outlined
the tree's outer edge with red ribbon from its tip to its base (1).
That illustrates the angle of taper the tree would like to
have.
We tied another ribbon at the point (2) we intend to be the
tree's new top.
We tied a third ribbon to the point that will be the new
top, and ran it at the same angle as the current taper, to the
tree's base. (3). This ribbon is nearly hidden inside the tree's
foliage, but you can see it at the point of arrow 3. And you
will see it clearly once we prune and it becomes the new outer
edge.
Where the inner ribbon crosses the lowest branches tells us
whether we can proceed to take off so much height and width .
If the lowest limbs have
enough depth of foliage inside that line so that they will
still be well needled after we cut, we have the green light. These
pass the test.


Above, left: Then we cut through the trunk at our chosen
point.
Above, right: We picked that point to reduce the tree by three
years growth. Here's the section we cut off, with
Janet's loppers poised to cut off just one year's growth -- from
the tip top to the whorl of side branches at the base of that
shoot.

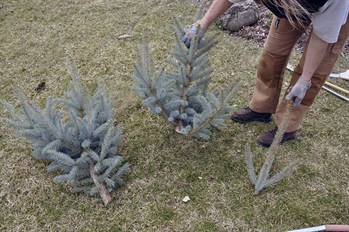
Above, left: Now the loppers are set to cut off the whorl
that formed two years ago. Each spoke in that section's basal whorl
has elongated and branched, and the buds along the main vertical
shoot have produced branches, too.
Above, right: From left to right you see the growth that was
new 3 years ago, two years ago, and in the most recent growing
season. We've left the living tip of the tree just tall enough to
reach where year 3 began. That will take 3 years' height off the
tree.
(Please note: You will see this top once more and it will be
intact. We didn't glue it back together. We actually cut the tip
into pieces after we were done with all the pruning and are only
showing it to you out of order for purposes of
illustration.)
Right: Now we've clipped back all the branches just
below our cut on the trunk. Then we bend upward and tie into place
one centrally placed branch. Use cord that will rot fairly quickly,
removing any impediment to growth. The upright branch will harden
in position fairly soon.
As long as it is upright and taller than all other shoots,
it will become the dominant branch tip at budbreak. Then it will
remain above the rest and keep the tree pyramidal by growing faster
and further than all other shoots.
Tying in a new leader isn't essential. When a tree loses its
top to weather or calamity, one or more side branches do turn
upright on their own, relatively quickly. We prefer to choose which
one will assume the lead, and eliminate any competition.
Each twig we leave to grow has a bud at its tip. Budded tips
can grow out, branch and become larger limbs.

Below: Now that the new top is set, descend the ladder,
cutting side branches so that their tips end at the ribbon.
We cut just one face at a time -- don't reach around the
circumference of the tree. Then we'll move the ladder, climb up and
cut down again.


Below: Here is how we cut the side branches so they will end
gracefully at our new line, without making the tree look sheared.
The ribbon is our desired outer edge. We cut what extends beyond
the ribbon by cutting to a side branch back within the new
outline.
This demo branch is one we've just removed from the tree. We
could cut it at Janet's hand (right arrow) which would leave the
tip of its next side branch (top center arrow) just reaching the
line.


Above: Or we can cut like so to remove the long central
segment...
...and then shorten the two side branches that remain. There is no
absolute right or wrong. Step down and cut each tier so it juts a
little further out than the one above.
Below: Cutting down each face and then moving the
ladder, we've come nearly all the way 'round the tree. Look at the
branches yet to be cut (arrows) to see how much we've reduced the
tree's width.
We could keep pivoting the ribbon as a guide for each new
face, but we've had enough practice to be able to eyeball the
angle.

Below, left: Up the ladder to prune out those last
branches.
See that ribbon on the far side, the one that was hidden as we
began, right in the tree's interior?
Below, right: You probably can't see Janet but she's up on
the ladder behind the tree, holding the old top and its ribbons
back in their original positions. The breeze is making one ribbon
billow out, the other in but we think you can still see how much
we've removed.

The tree can grow for two years now and reach to just inside
that line before we'll cut it again.
More about applying these techniques to other evergreens
and looking at more spruce situations, in the Ensemble Weekly
Edition, What's Coming Up
132.
*About the 60
minutes:
We normally work as a team with one pruner, one ground crew and
expect to spend just under an hour pruning a tree like this.
However, total elapsed time this day was two hours because our
ground crew was shooting photos. Total time for one pruner to do
the work, from cutting off the tree's top to making the last cut of
a side branch: 60 minutes. Total time for that person to then pick
up and bundle away the branches, 60 minutes.
One final bit of clean-up: The pruners we used (below) were
clean when we began this work. We'll use oil (turpentine works,
too) to wipe that sap off the blades, then resharpen them. It takes
more effort to open and close sappy blades. Also, they may mangle
more than cut the next plant.
Below: That's sap that will become hardened resin in no
time. Wipe it off to make pruning easier on your hand and the next
plant.


Budbreak usually calls halt to
pruning
About the spruce twig pictured at the beginning of this article.
It's breaking bud -- the bud cap's popping off as the growth
beneath it swells. Once a plant has broken bud for the season
it is not the best time to do the type of pruning we show you here.
The plant will respond differently to cuts made when its shoots are
actively growing, compared to cuts made while the plant is
dormant. If possible, schedule this pruning for after those
bud caps form in late summer but before they pop off in spring.
However, we don't live in a perfect world where circmstances
always cooperate. So we do sometimes prune to
reduce a plant's size during budbreak and shoot elongation.